
How to Set Up Studio Monitors for the Best Sound (2025 Guide)
With years of experience in audio, I’ll guide you through on how to set up studio monitors to get the maximum performance potential.
- April 26, 2025
STUDIO MONITOR SETUP GUIDE 2025

If you’re setting up your home studio or upgrading your current space, knowing how to set up studio monitors properly can make a world of difference. Even the best studio monitors won’t sound right if they’re not placed or connected correctly.
When I first started, I assumed buying quality gear was enough. But I quickly realized that proper monitor placement and setup are just as critical as choosing the right brand. If you’re still deciding which monitors to buy, you may want to check out my detailed breakdown of the best studio monitor brands before diving into setup.
In this guide, I’ll walk you through everything you need to do—from picking the ideal spot in your room to connecting your monitors to a laptop or audio interface.
In this guide we will know:
- Why Proper Setup Matters
- Step-by-Step Guide to Setting Up Studio Monitors
- Connecting Your Studio Monitors
- Recommended Gear for Your Set Up
Whether you’re a beginner working with your first pair of monitors or looking to fine-tune an existing studio, this step-by-step guide will help you get accurate sound, reduce unwanted reflections, and build a better mixing environment.
Why Proper Setup Matters
You might think that just placing your studio monitors on a desk and plugging them in is enough. But that’s one of the most common mistakes beginners make.

Improper setup can lead to:
- Unbalanced sound – Bass might feel boomy or highs might be too sharp.
- Poor stereo image – You can’t clearly hear where instruments are placed in the mix.
- Inaccurate mixes – Your mix might sound great in your room but terrible everywhere else.
Studio monitors are designed to give you an honest representation of your audio—but only if they’re placed and positioned correctly.
From my early experience, I had a pair of Yamaha HS5 monitors placed too close to the wall, and everything sounded bass-heavy. Once I repositioned them and treated my space better, my mixes instantly improved.
So if you want your music to sound professional on any speaker, getting the setup right is not optional—it’s essential.
Step-by-Step Guide to Setting Up Studio Monitors
1. Choose the Right Room
Before diving into monitor placement, it’s crucial to choose the right room to work in. Why? Because no matter how expensive your studio monitors are, if the room acoustics are off, your mixes will suffer.
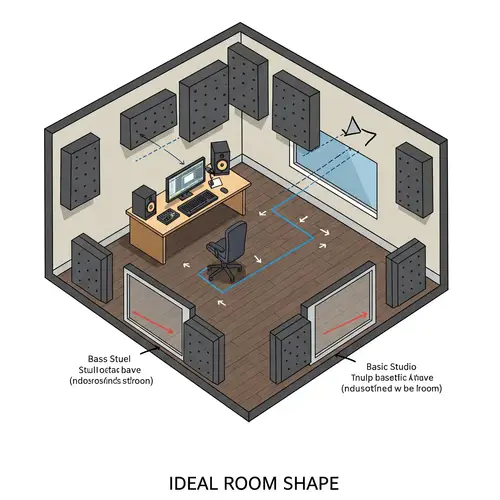
Ideal Room Shape and Size
Rooms that are with high ceilings and few parallel surfaces usually offer better acoustics. Try to avoid square rooms—they can cause standing waves and frequency buildups.
Pro Tip
Professionals say...
A room that’s about 1.6x longer than it is wide is often recommended by acousticians.
Avoiding Reflective Surfaces
Bare walls, glass windows, and tile floors reflect sound and introduce unwanted echoes. If possible:
- Use curtains over windows
- Add a rug if you have a hard floor
- Fill the room with soft furnishings (like bookshelves or couches) to naturally diffuse reflections
Pro Tip
Professionals say...
Even before applying acoustic treatment, these small changes will improve how your studio monitors sound in the room.
2. Find the Optimal Listening Position

Use the Equilateral Triangle Rule
To get the best stereo image, form an equilateral triangle between your head and the two monitors.
- Your monitors should be as far apart from each other as they are from your ears.
- Example: If your monitors are 3 feet apart, sit 3 feet away from each one.
This simple rule helps maintain clarity and prevents mixing errors.
Align the Tweeters to Ear Level
Your ears should line up with the tweeters—they handle high frequencies and are very directional.
- Use monitor stands or risers if needed.
- Slightly tilt them toward your ears for better focus.
This small adjustment can make a big difference when mixing vocals or fine-tuning details.
3. Monitor Placement and Angling
Even the best monitors won’t sound right if they’re placed incorrectly. Let’s fix that.

Distance from Walls Matters
Avoid placing monitors too close to walls—especially rear-ported models like the JBL 305P MkII.
- Keep at least 6–12 inches of space between the back of the monitor and the wall.
- This reduces bass build-up and improves clarity.
If you’re working in a tight space, consider monitor isolation pads to reduce reflections and vibrations.
Toe-In Angle for Better Focus
Angle your monitors inward so they point directly at your ears.
- A toe-in angle of 15–30 degrees works best.
- This improves stereo imaging and reduces phase issues.
Think of your monitors like a camera lens—pointed right at the subject for the sharpest results.
4. Desk & Stand Setup
Where you place your monitors—on a desk or stands—can seriously impact your sound.
Monitor Stands vs. Desk Placement
If you can, use monitor stands like the IsoAcoustics ISO-155.
- Stands allow perfect ear-level alignment and reduce vibrations.
- They also free up space on your desk, improving airflow and acoustic clarity.
If you’re placing monitors on your desk:
- Use monitor isolation pads to prevent vibrations from transferring into the surface.
- Angle them up slightly toward your ears if they sit below your head level.
Avoid Surface Reflections
A cluttered desk can reflect sound.
- Keep it minimal.
Avoid placing reflective items (glass, metal) between you and your monitors.
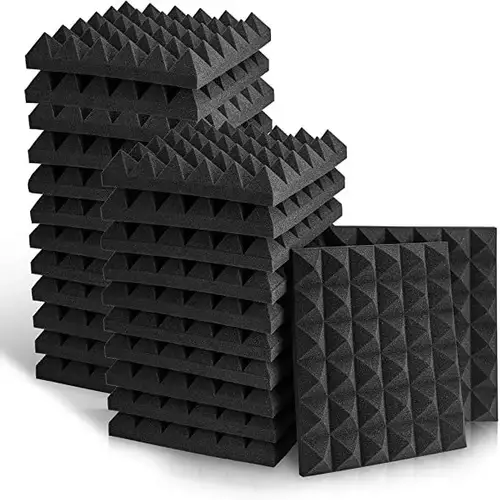
5. Acoustic Treatment Basics
Even the best monitors can’t perform at their best in an untreated room.
Why Acoustic Treatment Matters
- Without it, your sound will bounce unpredictably—causing muddy bass, harsh highs, and uneven mids.
- A few simple treatments can drastically improve how your mixes translate.
Key Treatment Elements


- Bass Traps – Place them in corners to absorb low-end buildup.
- Absorption Panels – Install on side walls and behind you to reduce reflections.
- Diffusers – Break up sound waves without killing room energy. Place them on the rear wall.
Even a rug, curtains, or a bookshelf can help dampen reflections in a home studio setup.
Pro Tip
Professionals say...
Start with the reflection points—this gives you the best results with minimal effort and cost.
Connecting Your Studio Monitors
What Equipment You’ll Need
Before setting up your studio monitors, make sure you have the right gear. You don’t need a complicated setup—just a few essentials.
Audio Interface
An audio interface connects your laptop to your monitors. It converts the digital signal from your computer into high-quality analog audio.
Popular beginner-friendly options include:
- Focusrite Scarlett 2i2
- PreSonus AudioBox USB 96

Cables
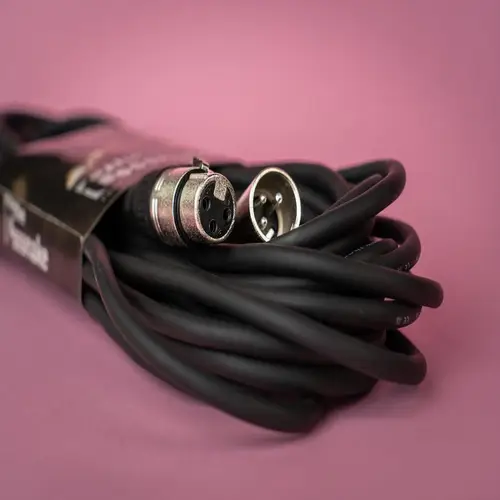
Use balanced cables to reduce unwanted noise and interference.
- TRS (Tip-Ring-Sleeve) – Looks like a regular headphone jack but has noise-canceling capabilities.
- XLR – Common in professional studios. Offers secure, noise-free connections.
Pro Tip
Professionals say...
Avoid using long unbalanced cables (like RCA or 3.5mm aux) for studio monitors—they can pick up noise easily.
Adapters
If your laptop doesn’t have the right output, you might need:
- TRS to 3.5mm adapter
- USB-C to audio interface (or dongle)

Step-by-Step Connection Guide
Connecting your studio monitors to your computer might sound technical, but it’s actually simple if you follow these steps.
Step 1: Plug Monitors into Power

Start by connecting each studio monitor to a power outlet. Make sure they’re turned off during setup.
Step 2: Connect Audio Interface to Your Laptop
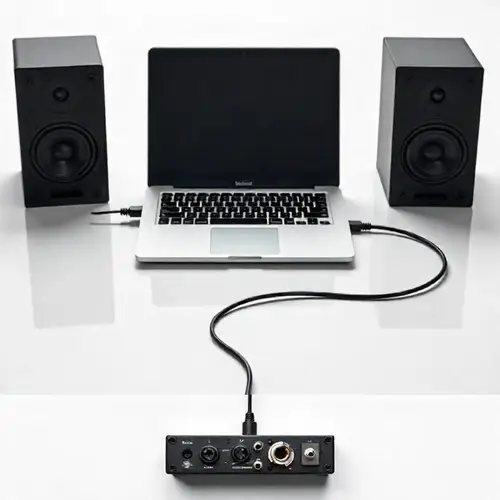
Use a USB or USB-C cable to plug your audio interface into your laptop. This is your bridge between the computer and the monitors.
If you’re not using an audio interface, you can plug directly into your laptop’s headphone jack using a 3.5mm to dual RCA/TRS cable—but this can reduce sound quality.
Step 3: Connect Monitors to the Audio Interface

- Use TRS or XLR cables.
- Connect Left monitor to the Left output (L) on your interface.
- Connect Right monitor to the Right output (R).
Make sure both monitors are connected securely. Loose connections can cause buzzing or volume drops.
Step 4: Power On & Adjust Volume

- Turn on the monitors and the interface.
- Keep monitor volume knobs at 50% to start.
- Control your overall level using the audio interface’s output knob.
Step 5: Test Audio

Play a track and make sure sound comes out from both monitors evenly. If not, check cable connections and output settings in your computer’s sound control panel or DAW.
Recommended Gear for Perfect Setup
Getting the right gear is just as important as the setup itself. Here are a few products from our Best Studio Monitors page that pair perfectly with a well-treated room:
🔊 Yamaha HS5 on Monitor Stands
A favorite among home studio users. The Yamaha HS5 delivers clean, accurate sound—especially when placed on monitor stands with isolation pads to reduce vibrations and improve clarity.
🎛️ KRK Rokit 5 G4 with Built-In Room Correction
The KRK Rokit 5 G4 not only sounds great, but its built-in room tuning features help optimize your sound without heavy acoustic treatment.
🎧 Adam Audio T5V with Audio Interface
Pair the Adam Audio T5V with a solid audio interface (like the Focusrite Scarlett 2i2), and you’re all set for a professional-grade sound setup—even in smaller rooms.
Each of these choices work well when combined with proper positioning and basic acoustic treatment. And yes—don’t forget those monitor isolation pads!
Conclusion
Setting up your studio monitors the right way isn’t just about plugging them in and hitting play. It’s about choosing the right room, placing your monitors correctly, connecting them properly, and avoiding common mistakes.
Even small tweaks—like moving your monitors a few inches away from the wall or lowering your listening volume—can have a big impact on your sound.
Take time to experiment with placement, listen critically, and fine-tune your setup. Over time, your ears will thank you—and so will your mixes.
Looking for the right gear to complete your setup? Check out our detailed Best Studio Monitor Brands guide to find trusted names in the industry or explore our Best Professional Studio Monitors roundup for top-tier options built for serious studios.


